A Step-by-Step Guide to install wordPress on localhost for Developers

Are you a developer or a fresher eager to explore WordPress? Whether you’re building a blog, a business site, or an e-commerce platform working on WordPress locally is a highly beneficial first step. In this guide we’ll walk you through the process of install wordpress on localhost focusing on the popular XAMPP server software.
By the end of this post, you will be confidently working with WordPress on your local machine, allowing for rapid development and testing without the need for a live web server. Let’s dive in!
Why Install WordPress on Localhost?
Before we begin let’s quickly address why you should consider install wordpress locally.
- Safe Testing Environment: Experiment with themes, plugins and code without the risk of breaking your live site.
- Fast Development: Local sites run faster as they don’t rely on internet connectivity.
- Offline Work: Develop your site anytime and anywhere internet or not.
- Learning Purposes: If you are a fresher this is the best playground to enhance your WordPress skills.
how to setup wordpress on localhost
To install wordpress on localhost we need a local server environment and XAMPP is one of the most popular and easy-to-use options. XAMPP stands for Cross-Platform (X), Apache (A), MySQL (M), PHP (P) and Perl (P). It’s a free and open-source solution that mimics the server environment on your personal computer.
Step 1 : Download and Install XAMPP
Here’s how you can install wordpress on XAMPP on your local server
- Go to the official XAMPP website.
- Download the version compatible with your operating system.
- Follow the installation prompts. Keep the default settings for a smooth installation process.
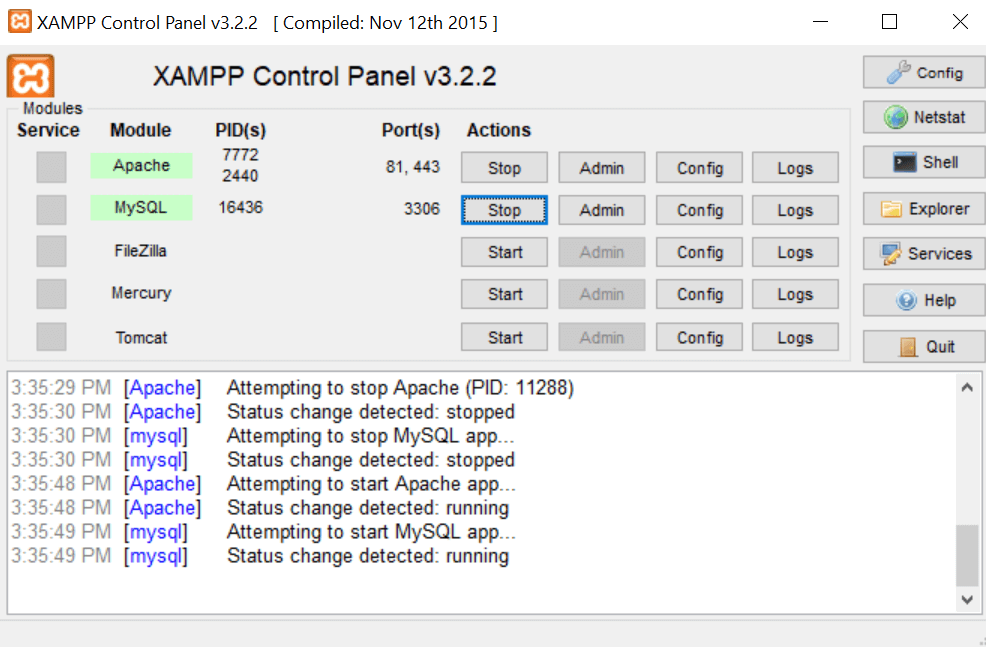
- Launch XAMPP Control Panel and start the Apache and MySQL modules.
Step 2: Download and install WordPress on localhost
Next, you’ll need the WordPress files:
- Visit WordPress.org and download the latest version of WordPress.
- Once downloaded, unzip the WordPress folder.
Step 3: Setting Up WordPress on XAMPP
Create a Database for WordPress
- Open a web browser and enter
http://localhost/phpmyadmin/ - In the phpMyAdmin interface click on the ‘Databases’ tab.
- Create a new database for WordPress (
Ex. testing_db) and click ‘Create’.
Install WordPress on localhost
- Go to the
htdocssubfolder within the XAMPP installation directory. - Inside htdocs create a new folder for your WordPress site (
Ex. my_wordpress_site). - Copy the unzipped WordPress files into this new directory.
Run the Installation Script
- In your web browser visit
http://localhost/my_wordpress_site/ - You should be greeted with the WordPress installation page.
- Choose your language and click ‘Continue’.
- Fill in the database details:
- Database Name: The name you created in phpMyAdmin (
wordpress_db). - User Name: Default is ‘root’.
- Password: Leave this blank for localhost.
- Database Host: Keep the default
localhost. - Table Prefix: You can leave it as is or change it if you’re running multiple WordPress installations on local server.
- Database Name: The name you created in phpMyAdmin (
- Click ‘Submit’ followed by ‘Run the installation’.
- Enter your chosen site title, username, password and email for your WordPress site’s admin account.
- Click ‘Install WordPress’.
Congratulations! You now have a local WordPress site running on XAMPP.
Exploring and Enhancing Your Local WordPress Site
Now that your WordPress site is set up locally, it’s time to start experimenting. Install themes and plugins, customize your site and develop new features all without the fear of breaking a live website.
When you’re comfortable with the changes and ready to go live, you can migrate your local site to a web server. Remember to backup your website regularly, even when working locally, to avoid losing your progress.
Possible Errors and Solutions
install WordPress on a local server in Windows typically involves setting up a web server stack like WAMP (Windows, Apache, MySQL and PHP) or XAMPP (cross-platform, Apache, MySQL, PHP, Perl). Below I’ll walk you through the steps to install WordPress using WAMP or XAMPP and list some possible errors that you may encounter along with their solutions.
Error 1: WAMP Server Not Turning Green
- Solution: This often indicates a port conflict, usually because another service is using port 80 or 3306.
- Try to stop other services like Skype or IIS that might be using these ports.
- Change the Apache port to something other than 80 (e.g., 8080).
Error 2: Missing Visual C++ Redistributable
- Solution: Download and install the required Visual C++ Redistributable packages from the Microsoft website.
Error 3: How to fix an error of PhpMyAdmin access denied in xamp
- Solution: This could be due to incorrect MySQL credentials.
- Ensure that you’re using the correct username and password (default is usually username
rootwith no password).
- Ensure that you’re using the correct username and password (default is usually username
Error 4: Error Establishing a Database Connection
- Solution: This is often caused by incorrect database details in WordPress’
wp-config.php.- Check the database name, username and password in
wp-config.phpand ensure they match the details you set up in phpMyAdmin.
- Check the database name, username and password in
Error 5: .htaccess File Permalinks Issue
- Solution: Permalink settings can sometimes cause issues.
- Go to the WordPress admin dashboard, navigate to Settings > Permalinks and re-save the settings to flush the permalinks.
- If
.htaccessis not writable or not working, you may need to update the file manually.
Error 6: WordPress Memory Exhausted Error
- Solution: This can be resolved by increasing the memory limit.
- Edit the
wp-config.phpfile and adddefine('WP_MEMORY_LIMIT', '256M');(or increase the number if it’s already there). - Alternatively, increase the memory limit in
php.ini(e.g.,memory_limit = 256M).
- Edit the
Error 7: File Permissions Error
- Solution: Incorrect file permissions can cause a range of issues.
- Ensure that folder permissions are set to
755and file permissions are set to644.
- Ensure that folder permissions are set to
Error 8: White Screen of Death
- Solution: This is often caused by PHP errors or memory limit issues.
- Enable WP_DEBUG in
wp-config.phpto see the actual errors. - Increase PHP memory limits as described above.
- Enable WP_DEBUG in
A Final Note to Freshers
As a newer developer, the learning curve might seem steep, but the experience you gain from working with WordPress on localhost is invaluable. Take advantage of forums, developer communities and online resources to continuously improve your skills.
Ready to Start Developing?
install WordPress on localhost is an essential skill for developers. It provides a secure and flexible environment where you can test and develop without limitations. By following this step-by-step guide, you’re now ready to explore the vast possibilities of WordPress development.
So go ahead, start your local WordPress journey today and take your web development skills to the next level! and you don’t know about how to Install WordPress Theme
FAQ
What is localhost and why should I use it for WordPress?
Localhost refers to your own computer and serves as a local server that you can use to run web applications without uploading them to a live server. Using localhost for WordPress allows you to develop your website privately, test plugins and themes, and make mistakes without any real-world repercussions.
Do I need to be connected to the internet to work on localhost?
No, you do not need an internet connection to develop on localhost. Once you’ve installed XAMPP and WordPress, you can work on your site completely offline.
Is XAMPP the only option for creating a localhost environment?
XAMPP is one of the most popular options, but there are others like WAMP (for Windows), MAMP (for Mac) and LAMP (for Linux). There are also one-click solutions like Bitnami that can simplify the process further.
Can I install multiple WordPress sites on localhost?
Yes, you can install multiple WordPress sites on localhost. You just need to create separate databases for each site through phpMyAdmin and install WordPress in separate folders within the htdocs directory.
What should I do if I encounter errors during the installation?
Common errors often relate to database connection issues. Ensure that you have entered the correct database details during the WordPress setup. If you’re encountering other issues, consult the XAMPP or WordPress support forums for assistance.