
How to Add Expires Headers in WordPress Using Plugin and Code
Introduction
The speed and performance of a website are crucial for its success. Responding within seconds is essential in a world where users expect near-instant responses. Add Expires Headers in WordPress instructs browsers to cache website resources locally for a specified period. Your site’s performance WordPress Security will be improved and repeat visitors load times will be reduced.
Why Add Expires Headers to Your WordPress Site
It would help if you used Expires Headers to ensure your WordPress site is as efficient and smooth as possible and maintains visitors after they leave.
Benefits for User Experience
- Reduced Load Times: The browser cache stores resources like images and stylesheets, making it faster to access these resources in the future.
- Less Data Usage: Visitors who return to your website will not be required to redownload static content, which saves a lot of data.
Advantages for Website Performance
- Decreased Server Load: When the static files are removed from your server, you will notice an improvement in the performance of your server.
- SEO Edge: Search engines consider speed one of the most important ranking factors, so having a fast website could result in better rankings.
- Better Conversion Rates: Visitors who arrive at a website that loads quickly are much more likely to become customers or followers if the website loads fast.
Method 1 : Add Expires Headers in WordPress Using Code
Editing the .htaccess file.
As a first step, you must access and edit the .htaccess file if you wish to add Expires Headers directly to your website. The following steps will show you how to do it:
- Backup Your .htaccess File: Each time you make changes to your .htaccess file, make sure that you back it up first.
- Access Your .htaccess File: Connect to your site via FTP or use your hosting control panel to access File Manager. The .htaccess file is located in the root directory of your WordPress installation.
- Add Expires Headers Code: To add expired headers to your website, insert the following code into your .htaccess file:
<IfModule mod_expires.c>
  ExpiresActive On

  # Images
  ExpiresByType image/jpeg "access plus 1 year"
  ExpiresByType image/gif "access plus 1 year"
  ExpiresByType image/png "access plus 1 year"
  ExpiresByType image/webp "access plus 1 year"
  ExpiresByType image/svg+xml "access plus 1 year"

  # Videos
  ExpiresByType video/mp4 "access plus 1 year"
  ExpiresByType video/mpeg "access plus 1 year"

  # Fonts
  ExpiresByType font/ttf "access plus 1 year"
  ExpiresByType font/otf "access plus 1 year"
  ExpiresByType font/woff "access plus 1 year"
  ExpiresByType font/woff2 "access plus 1 year"

  # CSS, JavaScript
  ExpiresByType text/css "access plus 1 month"
  ExpiresByType application/javascript "access plus 1 month"

  # Others
  ExpiresByType application/pdf "access plus 1 month"
  ExpiresByType image/vnd.microsoft.icon "access plus 1 year"
</IfModule>
Static resources like images and videos are cached for a long time, while more dynamic resources like CSS and JavaScript are cached briefly.
Using Plugins for Non Technical Users
If you’d prefer to avoid dealing with code:
- Choose a Plugin: Look for a caching plugin such as W3 Total Cache or WP Rocket, which supports expired headers when it comes to caching.
- Install and Activate: The plugin that has been chosen must first be installed and activated through the WordPress dashboard.
- Configure Plugin Settings: Click on the settings tab and navigate to the cache settings. You can manage your preferences by clicking the browser cache or expiration headers section.
Method 2 : Add Expires Headers With WP Rocket WordPress Plugin
Adding Expires Headers can dramatically improve your WordPress site’s loading time. Many caching and performance optimization plugins exist, but WP Rocket is a popular solution that simplifies the process. Expires Headers can be added using WP Rocket as follows:
Step 1: Install WP Rocket
- Purchase WP Rocket: Visit the WP Rocket website and choose the plan that fits your needs. WP Rocket is a premium plugin and you need to purchase a license.
- Download the Plugin: If you bought the WP Rocket plugin, you can download it from the account area of the WP Rocket website after making the purchase.
- Install and Activate: Log in to your WordPress dashboard, navigate to ‘Plugins’ > ‘Add New,’ click ‘Upload Plugin,’ select the downloaded WP Rocket file, and activate it once installed.
Step 2: Configure Browser Caching
- Access WP Rocket Settings: Find the WP Rocket menu in your WordPress dashboard, usually at the top or under ‘Settings’.
- Adjust Browser Caching: Go to the ‘Advanced Rules’ tab within WP Rocket settings. Here, you can manage the browser cache settings.
- Set Expiry Times: While WP Rocket automatically applies optimal browser caching rules upon activation, you can fine-tune settings if necessary. Generally, the plugin’s default settings are sufficient for most users.
Verifying the implementation.
You must confirm that the headers are the same regardless of whether you edited the .htaccess file or used a plugin:
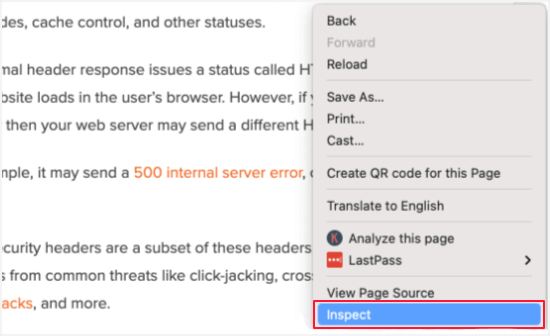
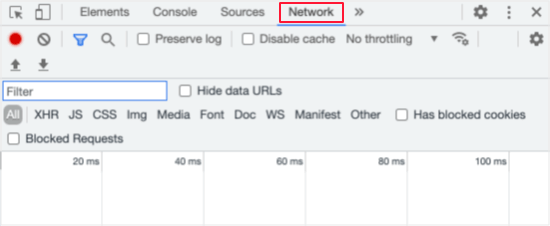
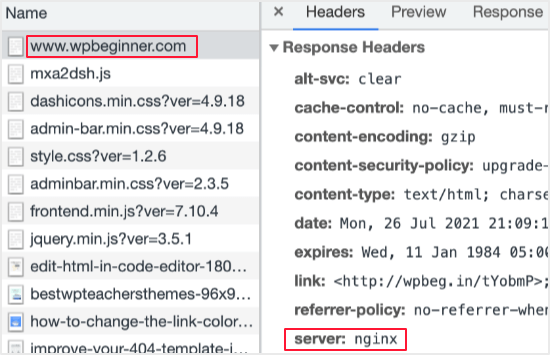
- The HTTP response headers can be inspected using the developer tools available in your browser (Network tab).
- Using online tools like GTmetrix to check if expiration headers are active is a good idea.
Best Practices When Adding Expires Headers
Exercise caution when setting the cache duration and naming conventions:
- Adaptable Expiry Times: Expiry times can be set to longer for less frequently updated resources and shorter for more dynamic resources.
- Version Control: It is advisable to use a versioning system (e.g., styles.css?ver=1.2) to invalidate the cache when updating resources such as CSS or JavaScript.
Conclusion
WordPress Expires Headers are a smart move for boosting speed, efficiency and user satisfaction. It can be as simple as editing your .htaccess file or as complex as using user-friendly plugins to implement caching policies. Maintain a fast and fresh user experience by monitoring the effects of every change to cache timings.
You are not only improving your site’s performance by incorporating Expires Headers; you are also setting a standard for how a professional, user-centric WordPress site should operate. Engagement and rankings from visitors and search engines will reward your diligence, leading to online success.
FAQ
How do I know if my WordPress website needs Expires Headers?
Check your website speed using tools like Google PageSpeed Insights. If it recommends leveraging browser caching, adding Expires Headers is beneficial.
Do Expires Headers affect dynamic content?
Expires Headers typically target static resources. Dynamic content such as HTML pages are not usually cached this way.